Greasemonkey Manual:Monkey Menu: Difference between revisions
revamp for toolbar-button-ness as in 0.9.2 |
simplify, improve grammar/layout |
||
| (12 intermediate revisions by 5 users not shown) | |||
| Line 2: | Line 2: | ||
{{Greasemonkey Manual TOC}} | {{Greasemonkey Manual TOC}} | ||
== The Monkey == | == The Monkey Menu == | ||
[[Image:Monkey-menu-4.0.png|left|thumb|160px|Greasemonkey's "Monkey Menu"]] | |||
As of Greasemonkey 4.0, the primary interface is through the "monkey menu", launched with the toolbar button. | |||
When enabled, the monkey is displayed in full color; when disabled, it is greyed out, and no [[user script]]s will run. | |||
The first item is a global enable/disable toggle for Greasemonkey as a whole. | |||
Disabling Greasemonkey with this control will stop all user script execution (on new pages). | |||
Following this is a list of user scripts which are configured to run on this tab, if any, in alphabetical order by name. | |||
Enabled scripts display normally while disabled scripts will be greyed out. | |||
Below the scripts for this tab are listed, in the same manner, any remaining installed scripts. | |||
Click any script in this list to be brought to the script management view. | |||
Beneath the script list is a shortcut for creating a new script, plus backup import and export items. | |||
At the bottom several helpful links are also present. | |||
<br clear=all> | |||
=== The Script View === | |||
The | |||
[[Image:Script-detail.png|left|thumb|160px|Script detail view]] | |||
As mentioned above, all script management is also performed inside the monkey menu. | |||
Select any listed script in the main menu to open its detail view. | |||
Here there are four options: toggle this script to be enabled (will run) or disabled (will not run), open the editor for this script, and uninstall this script. | |||
The fourth option opens a sub-menu for setting detailed options for this user script. | |||
Finally, some of the user script's detailed information is displayed at the bottom. | |||
In this case: the description and currently installed version number, a link to the script home page, and the last time the script was (installed or) updated. | |||
<br clear=all> | |||
[[Image:Script-options.png|left|thumb|160px|Script options view]] | |||
Within a script's detailed options view you may: | |||
* Enable or disable auto updating. | |||
* Manually check for updates now. | |||
* Add and remove custom @include, @exclude, and @match entries. | |||
The script's default settings are not replaced, the custom entries are added to them, unless you check "only use these". | |||
Latest revision as of 22:51, 14 December 2019
 Greasemonkey Manual |
| Using Greasemonkey |
|---|
| Installing Scripts |
| Monkey Menu |
| Getting Help |
| User Script Authoring |
| Editing |
| Environment |
| API |
The Monkey Menu

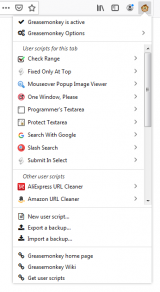
As of Greasemonkey 4.0, the primary interface is through the "monkey menu", launched with the toolbar button. When enabled, the monkey is displayed in full color; when disabled, it is greyed out, and no user scripts will run.
The first item is a global enable/disable toggle for Greasemonkey as a whole. Disabling Greasemonkey with this control will stop all user script execution (on new pages).
Following this is a list of user scripts which are configured to run on this tab, if any, in alphabetical order by name. Enabled scripts display normally while disabled scripts will be greyed out. Below the scripts for this tab are listed, in the same manner, any remaining installed scripts. Click any script in this list to be brought to the script management view.
Beneath the script list is a shortcut for creating a new script, plus backup import and export items.
At the bottom several helpful links are also present.
The Script View

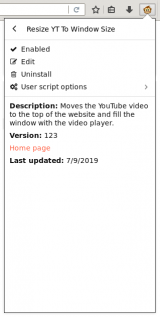
As mentioned above, all script management is also performed inside the monkey menu. Select any listed script in the main menu to open its detail view.
Here there are four options: toggle this script to be enabled (will run) or disabled (will not run), open the editor for this script, and uninstall this script. The fourth option opens a sub-menu for setting detailed options for this user script.
Finally, some of the user script's detailed information is displayed at the bottom.
In this case: the description and currently installed version number, a link to the script home page, and the last time the script was (installed or) updated.

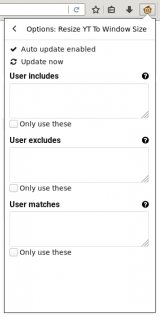
Within a script's detailed options view you may:
- Enable or disable auto updating.
- Manually check for updates now.
- Add and remove custom @include, @exclude, and @match entries.
The script's default settings are not replaced, the custom entries are added to them, unless you check "only use these".